The Exact Process I use to Set up a Pinterest Business Account as an Expert Pinterest Manager
Want to set up your Pinterest Business account or looking to clean it up so that its optimised for your business? Here’s the exact process I go through to set up my clients account as a Pinterest Manager - usually completed within a week. I’ve also gone ahead and added in the Tailwind account set up because this is always part of my process and essential for creating a successful Pinterest Marketing strategy for your business if you don’t want to be pinning manually 24/7.
Create the account
If my client is brand new to Pinterest I’ll set up a business account for them using their email address and password. I’ll also ensure their website is claimed and that rich pins are enabled. Click on the links for detailed posts outlining how to do each of those.
Determine who my client wants to target on Pinterest
This is such an important step in my onboarding process! Who do you want to target on Pinterest? What do you want to achieve? Who is your ideal client or audience? These factors determine the keywords you’ll use, the boards you’ll create and the content you’ll share. If you’re a vegan food blogger you’d research keywords linking to “vegan” “food” “recipes” and add the keywords into your board and pin descriptions, basically anywhere you can.
Create a keyword rich profile name
On Pinterest, profile names usually have keywords added to them. Mine is Haskin Creatives | Pinterest Marketing Expert, if I were a vegan food blogger it could be Haskin Recipes | Vegan Treats or a professional photographer Haskin Creatives | Destination Wedding Photography. You get the picture! Stumped on how to add more than 30 characters in your profile name? Here’s how!
Create a keyword rich profile description
Now you’ll want to add those keywords into your profile description as well while speaking directly to your ideal audience or customers. An easy formula for creating your profile description is I/We + what you do + for who. Be sure to make it keyword rich!
Bonus points if you add a call to action with a link. For some reason people want to be told what to do, so adding this in your description really reminds viewers what you are offering. Try something like “Grab my Free: link here” or “Find out more here: link here”. This a specific link for a freebie or your services, rather than your homepage.
Create your boards
I like to start off with 20 boards. First, I’ll create board directly linked to the content my client creates. A Travel Blogger might create a board solely dedicated to all of their blog posts, a yoga clothing brand might create a board dedicated to their brand of yoga clothes. The first board should be solely of the content creators because this board is the first one your viewer will see.
A travel blogger might then proceed to create other boards that are locations they have blogged about and have content for: a Southeast Asia board, Africa board, Europe board, and so on. Obviously keywords are always important - instead of having a board called “Southeast Asia” you could name it “Southeast Asia Travel” or even more specific “Budget Southeast Asia Travel”. We could even create more location specific boards based on countries. We’d also think of the content they’re creating - lots of trekking? Trekking board! What about luxury travel or backpacking? Volunteering around the world? The list is endless.
When you’re pinning your own content to boards, its a general rule that you’ll want each pin to go to five different and relevant boards. So keep this in mind when planning your boards. A product pin of a Brand T-shirt could go to the following boards: Haskin T-shirts, Printed T-shirts, Summer Fashion, Outdoor Wear, Haskin Clothing Outfits.
Once you’ve created these content specific boards you’ll then branch out to topics that your audience might be interested in but you don’t necessarily have any content on your site related to it. Perhaps the travel blogger could create a “travel gear” board or a “Safari” board even though they haven’t blogged about these topics yet, but they know people interested in their content would be interested in these topics too. Think about how your audience could “accidentally” stumble across your account through another topic or trending keyword.
Edit your board descriptions
First, make sure your board has a category selected. Next write a few well thought out, keyword rich descriptions. Search for the most popular keywords related to the board and then add as many as possible into your description without slamming them in there. Next, add your call to action and a link to your site.
Lastly, go ahead and add some hashtags. I always add the first hashtag as the name of the website or brand or client, mine would be #haskincreatives. I’ll also add a few other hashtags for searches I’d like to target on Pinterest like: #pinteresttips #pinterestmanager #pinterestmarketing #pinterestexpert
Fill your boards
At this point, I “fill” the boards with pins which translates to 10 pins in each board. The reason why we’re creating 20 boards and filling them with pins is so when a viewer gets to your profile, it’ll look complete and professional. Usually I work on creating a good balance between the client’s content and a few repins but for this initial stage I focus on repining content so the account gets built.
This is a good strategy for when you’ve just created an account and don’t have a lot of followers, so you won’t be spamming anyone with all of the pinning you’re doing. However, if you already have a following and are cleaning up you’re account go easy on just pinning a mass amount. Rather space out your manual pinning or schedule it using Tailwind - your followers will thank you!
A note on pin descriptions: If you’re uploading your own content pins or perhaps a pin doesn’t have a description, you’ll be using a similar strategy to when writing board descriptions. Use your keywords in a well thought out sentence, add a call to action with the link followed by your hashtags.
Followers
Throughout the week I’ll also research and follow a rough total of 100 influencers in the client’s niche. This doesn’t have to be a direct competitor but rather accounts with similar interests. Their content and content like this will show up in your home feed and tell Pinterest where your interests lie.
Many accounts are being suspended lately so be sure to do your following over a few days, you don’t want to be caught for spam. Here’s some extra info on how to avoid getting your Pinterest account shut down.
Tailwind set up
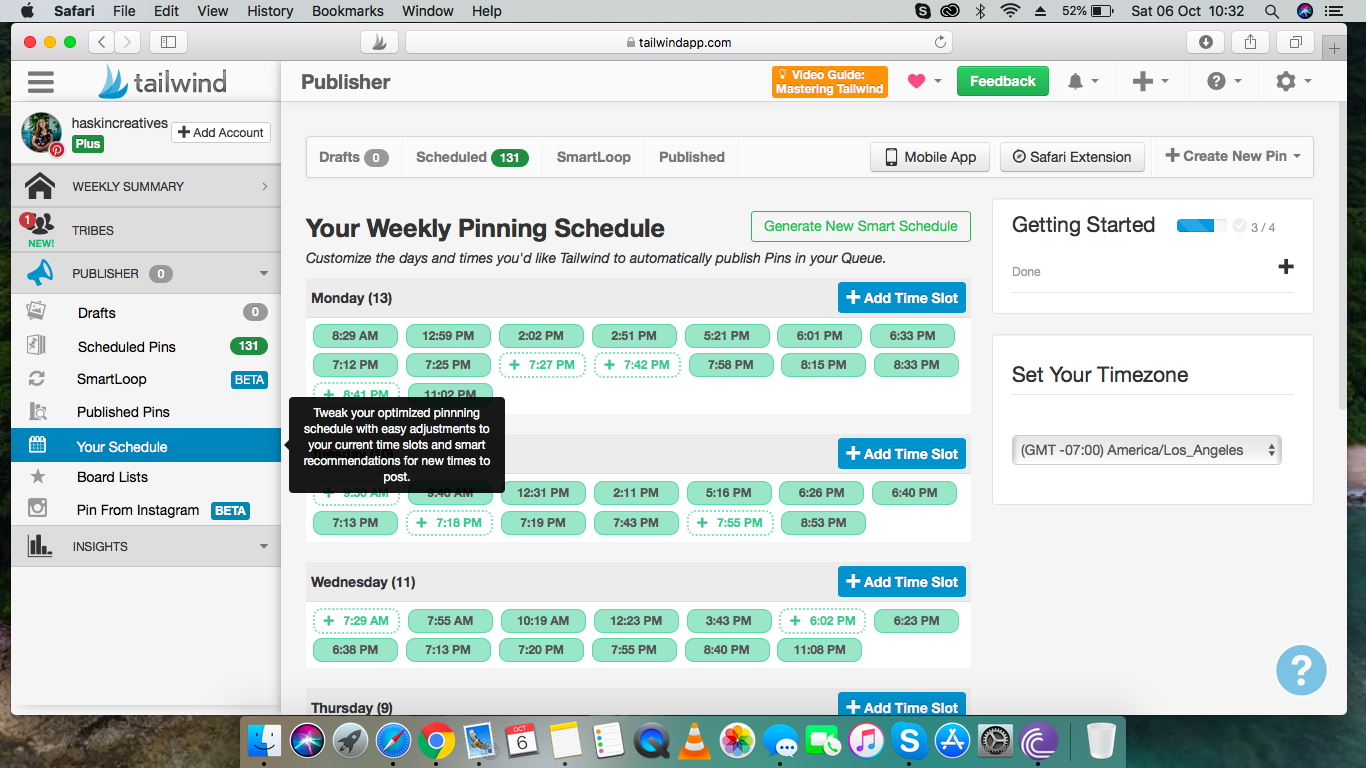
The last thing I get done for my clients is set up their Tailwind account. Using Tailwind is super simple if you use their video guides and tutorials so don’t feel overwhelmed by it! I honestly related most of my Pinterest success to the use of Tailwind. It allows you to schedule throughout the day at optimal times without actually having to be online and it gives you access to my most favourite feature - Tribes!
First I go in and edit the Tailwind schedule and generate a new schedule so that I’m posting 12 times a day. Now when you use the Tailwind extension or upload your own content, it’ll slot into these optimal times for you. *Tailwind has a detailed video tutorial when you sign up and they’ll teach you how to do this, no worries!
Next, I’ll research and join five niche related Tribes. Tribes make such a huge impact to your Pinterest growth because they are groups of likeminded people willing to share your content with their audiences. This means your account could just be starting out but you share a great pin and piece of content to a Tribe and reach thousands of people. Its seriously the best.
Tailwind is basically my BFF. I use it every single day and all of my clients are required to have it before signing up with me. If you’re looking to start your free trial and get your first month FREE, click this link.
And that’s it, folks. Everything I do to set up a Pinterest business account for my clients within a week.

Hello, I'm Megan!
An introvert at heart, Pinterest is the perfect platform for me. Simply posting your content using the right marketing strategies gets you an abundance of website traffic? No engagement or ‘showing up’ needed?
Who wouldn’t want to use this powerhouse of a platform …